Monster Macaroons and Creepy Crispies
October 17, 2013

From my Vacation in Vermont
I’ve been remiss in posting for a while. After the whole flood episode, I went on a wonderful vacation in Vermont (planned months ago), and then followed it with one of those whirlwind-of-unexpected-activities weeks at work. But it is mid-October, which means Halloween is approaching. So of course that inspired me to try to do a few ghoulish treats. My immediate inspiration was a post on Lil’ Luna, featuring neon green cookies with a single eyeball. How freaking cool is that? But I really wanted to make something simple, so I opted for a couple of different variations – one using coconut macaroons, and the second using rice crispy treats. I found candy eyeballs at Michael’s, but it looks like you can get them at some grocery stores, and I’m guessing that cooking stores would have them as well.
Macaroons can be deadly in terms of calories and fat, since they’re basically just coconut. But I’ve used Let’s Do Organic’s Reduced Fat Shredded Coconut previously and liked it, so I opted for half regular and half of the reduced fat stuff, as well as using a little over half erythritol and only 2 Tbsp of sugar. I found a great, simple recipe for coconut macaroons on Taste of Home, and followed it exactly with the exception of the 1/2 reduced fat coconut and food coloring.

All Ingredients Except the Coconut
Artificial though it (usually) may be, I make bold exceptions for food coloring when it comes to holiday baking. Baked goods are just more fun when they are vividly colored. (And that gel food coloring for cake decorating is awesome). For the neonish green I used green and yellow food coloring, and was very happy with the result. The coconut didn’t really dim the color down much at all after I added it.
I had initially planned to just attach the eyeballs with some simple icing after the macaroons cooled, but then I thought, hmmm….what if I made the icing red? And made it kind of ooze out behind the eyeballs? Oh, yeah! Great move – totally vivid and creepy looking!

Monster Macaroons
For my other item, I made Rice Crispy treats. The first batch I made was with half the amount of marshmallows and butter as the normal recipe calls for, and had added Chocolate PB2 and honey.
While they were good, they were rather unworkable, as there just wasn’t enough ‘stickage’ without the extra marshmallows. So those I ended up forming into a giant blob with eyes (and sprinkles), and then freezing them to get them to set up a bit.

PB2 and Honey Rice Crispy Monster Blob
Then I cut them into jaggedy pieces. They tasted awesome, even though they were sub-par format-wise.

Jaggedy Chocolate PB2 and Honey Crispies
Since I had leftover marshmallows and Rice Crispies, I decided to go ahead and make a more traditional batch with the full amount of marshmallows and butter. Once the marshmallow and butter were melted, I added orange food coloring. Which, when combined together, really served to highlight what kind of disgusting material marshmallows are made of. Oh well, it is Halloween, so it’s appropriate.

Melted Marshmallows and Butter with Food Coloring – Ew
Once I mixed the gross orange stuff in with the Rice Crispies, I packed bits into a muffin pan to make round shapes, and then pressed the eyes in, and refrigerated them to let them set up.
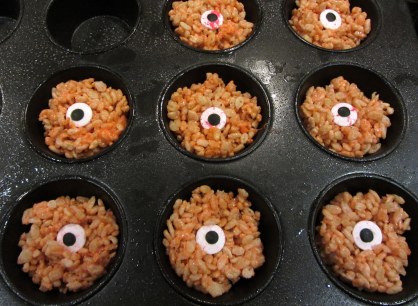
Orange One-Eyed Creepy Crispies
Here are the recipes for all three, should you care to try them yourself.
Monster Macaroons
adapted from First Place Macaroons on Taste of Home
makes 12 – double for more
2 egg whites
1/3 cup sugar (I used 2 Tbsp sugar, and the rest erythritol, available at Whole Foods)
2 Tbsp flour (I used white whole wheat)
1/2 tsp vanilla extract
1/8 tsp salt
1+1/3 cup shredded coconut (I used 1/2 reduced fat coconut, available at Whole Foods)
green, yellow, and red food coloring
candy eyeballs
1 Tbsp skim milk
powdered (confectioners) sugar
Preheat the oven to 325°. Line two baking sheets with parchment paper (or spray with cooking spray).
Beat together the egg whites, sugar, flour, vanilla, and salt with a mixer or a whisk. Add green and yellow food coloring a bit at a time, mixing well, until the desired color is achieved. Stir in the coconut, and mix well.
Make 12 equally sized hemi-spheres (as best you can), and place on the baking sheets. Push your finger or thumb gently into the middle of each to form a flat space to put the eyeballs onto later. Bake for 18-20 minutes or until fairly well set, and golden brown on the edges. Remove and let cool. (Theoretically you’re supposed to cool them on a rack, but I was pretty sure mine would fall apart if I removed them, so I just let them cool on the baking sheets).
Once the macaroons are cool, combine 1 Tbsp skim milk with a few tablespoons of powdered sugar. Then keep adding powdered sugar as necessary to make icing a bit thicker than honey. You basically want it to be only slightly drippy when you put it on the macaroons. Add red food coloring until your desired level of grossness. Then place a small bit on top of a macaroon, and press an eyeball into it. Thicken or thin the icing as needed, before finishing the rest. Allow to dry completely before storing.
Jaggedy One-Eyed Chocolate PB2 Crispies
makes about 12 – double for more
3 cups Rice Crispies
1 cup marshmallows
1 Tbsp butter
2 Tbsp honey
4 Tbsp PB2
2 Tbsp milk
candy eyeballs
colored sprinkles (optional)
Put the Rice Crispies in a large bowl, and set aside. Mix the PB2 and milk together in a small bowl and set aisde. Line a baking sheet with parchment paper (or spray with cooking spray) and set aside.
Melt the marshmallows, butter and honey in a microwave safe bowl for about a minute until the marshmallows are completely non-marshmallow-shaped. Add the PB2 mixture, and mix everything together well.
Add everything to the Rice Crispies and stir together well. Put the mixture onto the baking sheet and smooth it out. Press the eyeballs in at even intervals. Add sprinkles for extra bizarre detail, if desired. Place in the freezer until it sets up, and then using something that won’t damage the baking sheet, cut around the eyeballs to make jaggedy one-eyed creepy crispies. Store in a container in the freezer.
Creepy Crispies
makes about 16
4 cups Rice Crispies
2 cups marshmallows
2 Tbsp butter
orange food coloring
candy eyeballs
Put the Rice Crispies in a large bowl, and set aside. Spray a couple of muffin pans with cooking spray, and set aside.
Melt the marshmallows and butter in a microwave safe bowl for about a minute to a minute and a half, until the marshmallows are completely non-marshmallow-shaped. Add orange food coloring until you get the desired color. (This will be kind of gross at this point, bravely move on.)
Quickly add everything to the Rice Crispies and stir together well. Press even amounts into each muffin cubbyhole (whatever they’re called), and then press an eyeball into the center.
Boulder Floodie’s Post-Flood Whatever Bean Tomato Rice*
September 21, 2013
First let me open with this: when you are told by FEMA that you are in a 100-year floodplain, and your mortgage company requires you to buy flood insurance, the appropriate response is, ‘Oh, ok. Let me read up on that so that I 1) have some knowledge about what one should do if caught in a flood and 2) know exactly what is and what is not covered by flood insurance. The correct response is not ‘Yeah, yeah, 100-year floodplain, whatever.’ Last week was certainly an interesting one in Boulder and many surrounding communities. Boulder’s average annual precipitation is just over 20 inches. In six days we got over 17 inches of rain — over half of it in one day.
Last Wednesday night we had our first hint of what was to come from a badly leaking window and a running sump pump. An hour later, our basement was flooded with two inches of water. We brought several things up to the garage, and lifted other things up to higher perches in our crowded basement that admittedly looks like it might feature in an episode of Hoarders. We knew that boxes being saved for future shipping needs, as well as just about anything paper was probably a goner already, so we didn’t bother with those, and left them on the floor in the water.

Basement – Flood I
We went to bed hoping the sump pump would empty out the water overnight. Which it did. But it kept raining on Thursday. Just before dinner time, the basement once again flooded with another two inches of water. My husband pulled the pump from our fountain in the backyard for extra pump power, and MacGuyvered that up to go out a basement window. But rain kept coming, and the water kept getting higher. We went down to try to lift things up even higher, but on several of the heaviest items (the 100+ lb ones), we said ‘well, it’s insured – what happens happens’. (This was mistake number…whatever number we’re up to — personal items are NOT covered by either the flood insurance with FEMA or homeowners insurance). And so it kept on raining. And the level in the basement kept on rising. At one point, the toilet started overflowing, filling the basement with even more water (and no doubt all the other things that come out with sewer water). So we abandoned the basement, and turned its power off, aside from the outlet near the ceiling where the sump pump was plugged in.
Shortly after that my husband let fly an expletive and said ‘Look at the street!’ Look at the street, indeed! But it could no longer technically be called a street. It was rather hard for any of us to get great pictures since it was dark and creepy out, but these do a fairly good job of illustrating why I was rather freaked out that night. Our former street was now a rapidly flowing river.

What used to be our street
And a picture that shows a little perspective on the depth of the river:

Another view of our street (Photo courtesy of Sondra (Wray) LeClaire)
What was even more disturbing was what was going on two houses further upstream.

Two houses upstream (Photo courtesy of Sondra (Wray) LeClaire)
We stood on the lawn in the rain and watched the river for a while with our next door neighbors, then came in and caught a little tv to try to take our mind off things. Around midnight we decided to go to bed, hopeful that the river would be gone in the morning. Luckily, we had our street back by the time we woke up on Friday morning.
There were a few things we didn’t have, however – since our basement flooded to over the doorknob on the door at the foot of the stairs, we had no furnace, no hot water heater, and no hope for successful flushing in the restrooms. So we headed out for breakfast and supplies (we discovered that during the night our makeshift plumbing for the 2nd pump had broken and was merely putting water back in the basement via a different window well). Once we returned with extra pipe, we were able to MacGuyver an improved drainage route with an assist from our neighbor and a couple of his tarps.
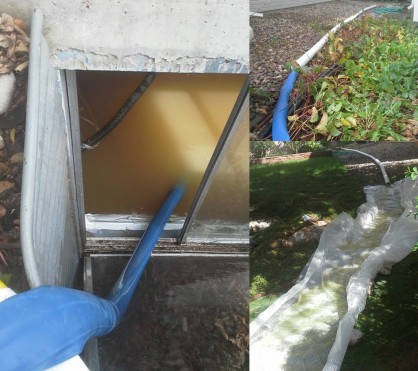
Mac Guyvered Pump and Drainage System
Our basement had flooded to about four feet. At this point we started calling around to see if we could find some professional help from people who actually had a clue how to clean up from a flood. It took five calls, but we got a slot at #4 on the list of a company coming out from Overland Park, Kansas. Fortunately with our increased pump power it started to drain quicker, and actually emptied out the basement by the next day. But with a basement full of soggy stuff, we were still totally up for help.

Basement Flood II
Then came the time where we found out what our flood insurance actually covered. It covers cleanup, and as the foreman of the crew helping us said, ‘basically what would be left if you picked up your house and shook everything out.’ Minus any finished basement features including carpet, tile, and quite a bit more. Alrighty then. Now we know. So, long story short (and still not over yet), the cleanup crew hauled out carpet, drywall, a multitude of trashbags, a parade of college-era furniture, electronics and stereo equipment. Antimicrobials were sprayed, dehumidifiers deployed, windows opened. Furnace and hot water heating companies, trash haulers, and insurance companies were called.
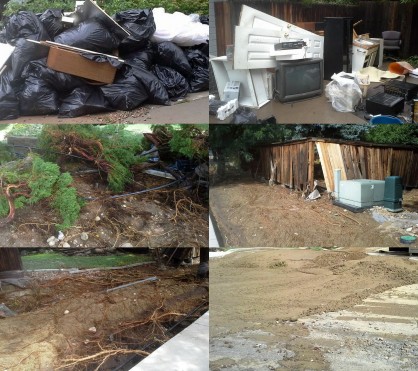
Our two main piles of stuff, and some of the damage in our neighborhood
We’re still working on cleanup, and will be for a while, but honestly – we still have our house, we can still get to our house, and we still have the vast majority of our possessions. We are so much better off than so many people in the surrounding areas. There were several deaths, many people still missing, and so many people have either had their homes destroyed, can’t get to them, or can’t get out of their mountain town. We are very fortunate.
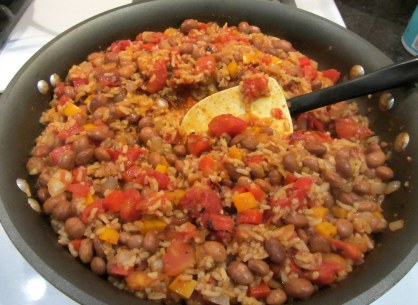
So now a little food, since this is a food blog. I was not in a great mood for cooking over the weekend. So I was really looking for something easy to throw together that was still healthier than the snack food I’d been eating off and on between phone calls and cleaning. I cooked some heirloom beans one day, since that was pretty easy. We had nearly a whole carton of rice left over from our delivery from Tra Ling’s the previous night, and I had a pepper and some onions in the fridge. I picked up a can of fire roasted tomatoes, and decided I’d make something like dirty rice. But, unbeknownst to me, I had no clue what dirty rice was – dirty rice is dirty because of chicken liver or giblets. I prefer my rice to be dirty from curry or tomatoes. So I went with tomatoes.
Post-Flood Whatever Bean Tomato Rice
serves 4
2 cups pretty much any kind of cooked beans
2 cups cooked rice – white, brown, wild, whatever
1 can fire roasted chopped tomatoes
1/2 cup chopped bell pepper – red, orange, or yellow
1 cup chopped onion – white, yellow, or red
2 cloves minced garlic (or be lazy and use garlic powder)
1 tsp olive oil
chicken stock
chili powder
hot smoked paprika or just paprika
Aleppo pepper or other dried red pepper
salt
black pepper
Heat the olive oil over medium in a large skillet. Saute the bell pepper and onion until tender. (If using real garlic, add it a few minutes after the bell pepper and onion.) Add the tomatoes, and about 1/3 cup of chicken stock. Then add some chili powder and paprika, and a bit of the Aleppo or dried red pepper, salt, and black pepper. Taste and adjust as desired. Then turn the heat up and let it cook until the liquid reduces down.
Post-Flood Whatever Bean Tomato Rice
* I can’t take credit for ‘Boulder Floodie’ – that was my friend C’s suggestion – thank you, C!
Spaghetti Squash with Grilled Tomato and Pesto Sauce
September 13, 2013
I finally got back in the kitchen to make something more interesting than my summer fat loss contest staples of salmon burgers and Fattousch Salad. This meal wasn’t really planned ahead of time, though. It basically came out of poor planning, a couple of things I bought independently, and a sample my mom sent home with me on Labor Day.
I’m a complete sucker for spaghetti squash. As much as I love pasta, I substitute spaghetti squash for it fairly often. So I bought a spaghetti squash at the store, but neglected to get any tomato products. Luckily, I had made a purchase of eight large paste tomatoes (I’m nearly certain they were San Marzanos) from Munson Farms over the weekend as well. Of course I would use some of my Chesnok Red garlic from Wee Bee Farms, because a good, bold hardneck garlic is always perfect for tomato sauce.
As I pondered my sauce, I started wondering what would happen if I threw in some of the pesto my mom made with basil from her neighbor’s garden. Hmmm…could be intriguing. Would certainly make it richer. So I had my ingredient plan. But the thought of standing in front of a hot stove on a 90 degree day while I cooked down fresh tomatoes didn’t really appeal to me. That’s what the grill is for, right? I read an article somewhere last year that said you could grill almost anything. I couldn’t remember exactly what they grilled for the article, but surely tomatoes would be fine. Plus they’d have a nice grilled flavor, which sounded great. I figured I’d peel the excess papery stuff off of a couple small heads of garlic and throw that on as well. And then I’d finish it off on the stove. (I’ve tried both roasting in the oven and microwaving, and given the HUGE amount of time it seems to take in the oven, I’m all about microwaving it these days).

Tomatoes and Garlic on the Grill
I grilled the tomatoes on a medium heat, turning them by about a quarter whenever they got charred. Total time, maybe around fifteen minutes. While they were grilling, I cut the spaghetti squash in half, scooped out the seeds, and poked the shell a bunch of times with a knife, so it would be ready to microwave.
Once sufficiently charred, I took the tomatoes and garlic off (the garlic didn’t char, but got nice and soft – perfect). Then I started microwaving the spaghetti squash (checking it after about 8 minutes, and then every couple of minutes by poking the shell with a fork), and heated about a teaspoon of olive oil in a skillet. I removed the tough core stuff around the end of the tomatoes (which were quite hot, so I pondered removing them before grilling in the future, but that might have made grilling a bit messier), and took the roasted garlic cloves out of their peels and minced them. Then I added all of it to the skillet. Since they were nice and soft, I just smashed the tomatoes with a wooden spoon.

Grilled Tomatoes and Garlic, with a Bit of Pesto
After everything was broken down fairly well, I added 4 teaspoons of pesto, and continued cooking the sauce down on medium heat until it reduced by about a third.

Grilled Tomato and Pesto Sauce Cooked Down
Once my spaghetti squash was nice and tender, I used a fork to turn it into squash pasta, then topped it with my sauce. The sauce turned out really well between the fresh tomatoes, grilled flavor, and the richness of the pesto. Not bad for non-planned!

Spaghetti Squash with Grilled Tomato and Pesto Sauce
Body Fat Loss Contest Results
August 24, 2013
After what seemed like an interminable amount of time towards the end, my body fat loss contest is over. I didn’t win (though it looked like I actually had a chance towards the end), but I was very happy with my results. The winner was calculated by who had the highest percentage loss divided by their starting percentage. Since my starting body fat percentage was 33.7, that’s a pretty big number to divide by. I did actually lose the highest percentage of body fat, but the calculation put me in third place.
Looking back, I had some pretty lofty goals as to what I wanted to achieve. I hit my target for overall weight loss and then some, and was very close to my non-stretch goal for percentage body fat. I did lose nearly a pound of lean body mass as well, as I found first hand what is true for most people – it is extremely difficult to both lose fat and gain muscle at the same time. But of my weight lost, less than 10% was lean body mass – and over 90% was fat. So not bad at all.
Here are my starting, goal, and actual stats:
Starting:
height: 5′ 3+3/4″
weight: 140 lbs
lean body mass: 92.9 lbs
fat body mass: 47.1 lbs
percentage body fat: 33.7%
Main Goal / Stretch Goal:
weight: 134 lbs / 132 lbs
lean body mass: 94.9 lbs / 97.4 lbs
fat body mass: 39.1 / 34.6 lbs
percentage body fat: 29.2% / 26.2 %
Actual:
weight: 130.4 lbs ==> -9.6 lbs
lean body mass: 92 lbs ==> -0.9 lbs
fat body mass: 38.4 lbs ==> -8.7 lbs
percentage body fat: 29.4% ==> -4.3%
When I started out, I think my daily calories were too low, and I was restricting myself from indulgences too much. I didn’t make wonderful progress to start. The changes that resulted in finally moving in the right direction consistently were 1) eating more calories, 2) adding some more indulgent foods back in, 3) more ‘natural movement’ workouts (walks and hikes instead of cardio machines), and 4) longer workouts. Once I made these tweaks, things started happening. I know that graphs aren’t typical fare on a food blog, but I am a physics major/career software test engineer, so I found these quite interesting. All of these graphs are a 7-day rolling average, with polynomial trendlines added. You can see very clearly how when my caloric intake increased, and I started to increase the duration of my exercise (also burning more calories), my weight started to go down. The exercise graphs look a little wonky, but I think the reason is that whenever I did long hikes, the calories and duration were way up there (most of the hikes I did have an average grade of 10-20%, so they burn quite a few calories). And on weeks that I did more weightlifting, the calories and duration were lower.

Note: My scale showed me 1.4 lbs heavier than the ‘official’ scale did. Hence the ending rolling average weight of about 132 in the graph below.

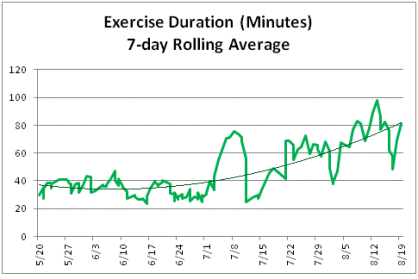

So, the bottom line conclusions that I’ve drawn from the experience: If you try something for several weeks, and it’s not working, shake things up a bit. No one thing works for everyone. You have to find what works for you. And often that means varying things fairly often! Find whatever exercise(s) you enjoy doing and will keep doing. If something doesn’t feel natural (like a lot of cardio machines), then you probably want to limit your time doing that, or better yet, find something else. And lastly, eat healthily, and don’t eat too much, but don’t deny yourself completely from having something fun once in a while. It will keep you going without feeling like you’re sacrificing everything. And remember – tomorrow is a new day, you can start over as often as you need to. Just don’t quit!
Pseudorandom Stuff
August 11, 2013
I’ve been rather neglectful of my blog this summer, mainly due to the difficulties of eating with this body fat loss contest I’ve been doing all summer. But that’s kind of a lame excuse. I could be whipping up meals high in low-fat protein, vegetables and unrefined grains. Instead I’ve pretty much just been rotating the same stuff over and over for the past few months. My goal starting in late August is to get out of the food rut I seem to have gotten into.
But even with a mostly dull food summer, I still have a couple things to share. I went to the Farmers’ Market this weekend, and was greeted with a huge array of gorgeous heirloom tomatoes from Far Out Gardens. Every time I buy tomatoes at this stand I am nearly speechless when I eat them. They are so packed with flavor – and such a variety of flavor, at that. It always makes me wonder how these fruits can be related to the red-on-the-outside, pinkish-white-on-the-inside, flavorless orbs you find in supermarkets.

Heirloom Tomatoes and Eggplant from Far Out Gardens
On the restaurant front, I recently went to Denver’s Linger with my book club for our non-book month event. Linger is the sister restaurant to one of my all-time favorite Denver restaurants, Root Down. It features Internationally inspired small plate dishes, in a fun, eclectically decorated environment (with a killer patio on the roof as well). Only four of my book club attended, so we didn’t get to sample as many dishes as we could have with more people, but what we did have was quite delicious. The only problem I had with the restaurant was that it was too difficult to narrow down your choices from the menu – everything sounded so great!

Seasonal Ceviche
We all split a lovely ceviche to start. (I’ve forgotten what kind of seasonal fish was used. Oops.)

Sesame BBQ Tacos / Kobe Short Rib, Napa Slaw, Radish, Avocado & Lime
The picture doesn’t do the tacos justice – they were quite pretty. I wasn’t absolutely in love with the first one, but by the time I got to the last one the flavors had really grown on me.

Roasted Beet Salad / Puffed Rice, Crunchy Lentil Noodles, Chickpeas, Red Onion,
Cashews, Fresnos, Cilantro, Raita, Peanuts, Tomatoes & Quinoa
Two of my dining companions got the Roasted Beet Salad, and had nothing but good things to say about it.

Ginger-Chili Shrimp / Green Papaya Salad, Scallions, Peanuts & Sesame Seeds
The Ginger-Chili Shrimp was very tasty. I probably wouldn’t have ordered it had I known it was lightly tempura-fried, but that didn’t stop me from eating all of it.
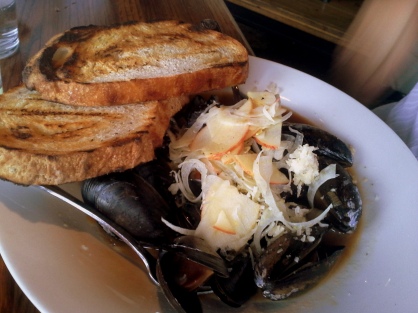
French Onion Mussels / Parmesan-Gruyère Sourdough, Gala Apples & Fennel
The French Onion Mussels were incredible. I only tasted one, but it was the single-most wonderful mussel I have ever had. Normally when you eat mussels you feel a bit of resistance when you bite into them. These mussels were so soft, they merely melted. Totally fresh tasting, no fishiness in the least. Definitely going to have to get that myself next time I go.

“Devils on Horseback” / Applewood Smoked Bacon Wrapped Medjool Dates, 10
Herbed Goat Cheese & Sambal Gastrique
Ah yes, the Devils on Horseback. Wow. Dangerous to your diet, but oh so worth it. Again I only tried one, but it was so full of comforting savory and sweet flavor that it was actually what I remember most about the meal.
